Use the handy set up guide below to get started with your H2O e3™.
Using the H2O e3 eActivator & eSprayer


Step 1
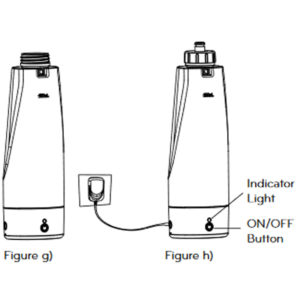
Fill the eActivator, shown in figure g) below, with 450ml of regular tap/drinking water.
WARNING: Do not use hot or boiling water to make S-Water™, and do not heat or boil the finished S-Water™.
Step 2
Add one spoon (provided with unit), which equals to 3g, of regular, table salt.
Step 3
Close the eActivator cover and shake it for a few seconds, until all the salt is dissolved. Then place the eActivator on a level surface.
Step 4
Replace the Water Tank Cap and turn to “CLOSE” position. Make sure the Copper Cone inside the Water Tank is always submerged in water while operating the unit. Never put cleaning detergents into the Water Tank. Unless approved by the manufacturer, do not put any scented products in the Water Tank. The H2O™ HD Steam Cleaner uses tap water, but in areas with hard water use distilled water for better performance.
Step 5
Plug in the Adapter into the eActivator, and then press the ON/OFF button, see figure h) above. The red indicator light will turn red and the electrolysis process will begin. NOTE: The electrolysis process is preprogrammed to run for 10 minutes, and it will automatically stop after 10 minutes of electrolysis.
Step 6
Once the electrolysis process is done and 10 minutes has passed, the indicator light will turn green, indicating the electrolysis process is complete and the S-Water™ is ready for use.
Step 7
Optional: To create an even more effective antibacterial version of the S-Water™, after the electrolysis process is done, add one spoon of white vinegar (0.21ml) to the eActivator and shake to mix it in.
NOTE: The generated S-Water™ (with or without vinegar) will be effective for 1-2 weeks. After two weeks, its effectiveness will be lowered considerably.
WARNING: Do not drink, heat, or mix the generated S-Water™ with any cleaning or sanitizing products and keep it out of reach of children
Step 8
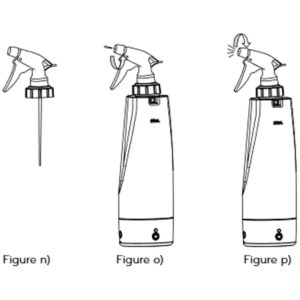
Place eSprayer Nozzle, shown in Figure n), onto the eActivator.
NOTE: Turn the eSpayer Nozzle Head in either direction, as shown in Figures o) and p) below and choose between a more concentrated or wide spray mode.
Assembling H2O e3 eMop


Assembly Step 1
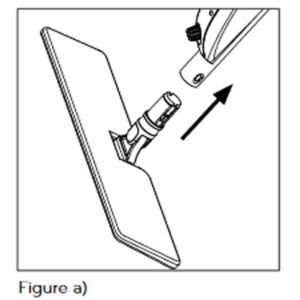
Install the eMop Head onto the eActivator Holder, as shown in figures a) and b) below.
Assembly Step 2
Connect the two aluminum pipes as shown below in figures c), d), and e).
Assembly Step 3
Insert the Power Supply Cord into the Cord Lock Slot located on the handle.
NOTE
The buckle hole on the upper aluminum pipe should be aligned with the buckle on the bottom aluminum pipe when connecting. Make sure that the buckle clicks into the buckle hole for secure assembly.
Using the H2O e3 eMop


Step 1
Insert the eActivator into the eActivator Holder as shown in figures i), j) and k) below. Then, turn eActivator locking mechanism to secure the eActivator in place, see figure k).
Step 2
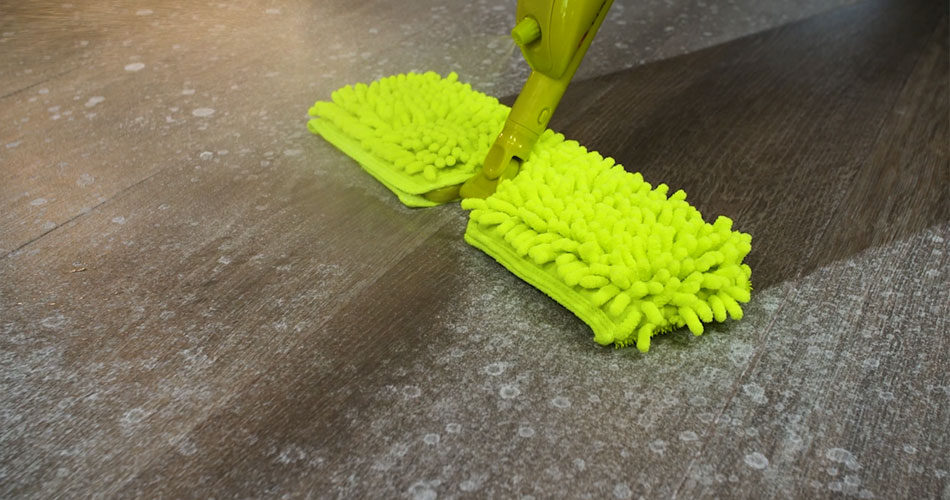
Place the Double-sided eMop Cloth onto the eMop Head and press the trigger, shown in Figure l), upwards, in order to spray the S-Water™ from the eMop Nozzle* onto the floor. *NOTE: Turn the eMop Nozzle in either direction, as shown in Figures l) and m) below and choose between a more concentrated or wide spray mode.
Cleaning & Maintenance
Step 1
The Double-sided eMop Cloths are machine washable or they can be rinsed under tap water. Always, make sure they are completely dry before next use.
Step 2
The H2O e3 eMop can be cleaned with a damp cloth.
Step3
The inside of the H2O e3 eActivator can be cleaned thoroughly with vinegar. Place approximately 50ml of vinegar and 200ml of water into the eActivator, close the eActivator cap and shake the contents. Let the water/vinegar solution sit inside the eActivator for 20 -30 min. Empty the eActivator, rinse thoroughly with regular tap water and use new water to make the next batch of S-Water™. If necessary repeat the cleaning process or let the water/vinegar solution sit longer inside the eActivator until limescale is completely removed from the metal mesh. In areas with hard water limescale removal should be done more frequently.
Step 4
It is recommended to clean the inside of the eActivator if it is used for electrolysis more than once. For example, if you are making multiple batches back to back and having the electrolysis process run for more than 15-20 minutes, add vinegar to the water tank after use and shake it and soak the metal electrolysis net for about 3 minutes. After cleaning with vinegar, rinse it thoroughly with regular tap water again.
Click Here to discover more on our blog or shop now to find the latest deal for the H2O e3™ Cleaning System.

